The diary of a hydroponics novice

Notes from one of our first customers who purchased the HydraMax 1-bucket system

In recent years, I’ve occasionally grown cannabis in commercial soil for personal use, producing some pretty decent results. Now, I’ve decided to experiment with the hydroponic HydraMax system offered by Green Cult to see how much faster and with what higher yield it can bring cannabis to flower. This could be particularly interesting for Cannabis Social Clubs (grow clubs) in Germany, but obviously on a much larger scale. I should note that I’m not a professional grower—much of what I’ve learned has come from YouTube, online research, experience with soil growth, and conversations with experienced growers before and throughout this project.
 

I knew upfront that there would be an initial investment, but my goal was to stick to the essentials to figure out what’s truly necessary versus what’s just nice to have. I generally advise against buying super cheap hydroponic systems from eBay or other platforms, as they often end up breaking down after just one or two harvests. HydraMax, however, is a well-established American brand, professionally developed, and the leading name in the U.S. market. Thankfully, you can purchase these systems in Europe through Green Cult (www.green-cult.com).

My shopping list looked like this:

  • 1 x HydraMax 1 container system incl. pump
  • 1 x grow tent (1 x 1m, 2.0m high)
  • 1 x 150W plant lamp
  • 1 x WLAN 3-way socket with app (incl. timer function and power consumption meter)
  • A starter set with nutrients from CANNA
  • A small fan
  • A small exhaust air system from PrimaKlima
  • A small measuring pen for water temperature, PPM + EC

I’m still waiting for my small fan which is currently not available. To document the difference between hydroponic and soil cultivation, I placed a small plant in a soil pot alongside the hydroponic setup in the tent. Soon, it should become clear how differently the two plants grow in comparison. Both will receive the same light schedule: 18 hours during the vegetative stage and 12 hours in the flowering stage.

After allowing the seeds to germinate in paper towels for a few days, I planted one in soil and carefully placed another in the neoprene sleeve of the HydraMax bucket. The soft neoprene sleeve is perfect for holding the plant gently, without putting pressure on the fragile stem. To differentiate the two, I’ve named the soil-grown plant ‘Terra’ and the one in the HydraMax system ‘Aqua.’

Growing Terra: The preparation for Terra was quite straightforward. I mixed high-quality commercial soil with plant granules for aeration and added a popular fertilizer known as ‘Chicken Shit.’ After planting, all that’s needed is regular watering.

Growing Aqua: Aqua’s setup is a bit more complex, though not unexpectedly so, as I had already done thorough research into hydroponics and was familiar with the key steps.

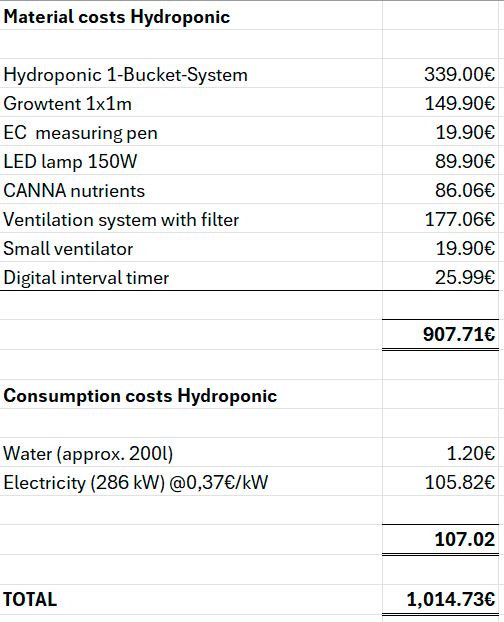
I’d like to briefly step away from my project to explain some basic but crucial concepts for understanding hydroponics.

Hydroponics and RDWC: In recirculating deep water culture (RDWC), water is pumped through one or more containers, allowing nutrients to be distributed quickly and evenly. The plants are secured so that their roots remain suspended in the water. In the HydraMax system, each container has a patented circulator that continually oxygenates the water, ensuring that the roots can absorb oxygen right away. Unlike soil, water contains zero nutrients, so these must be added in a controlled and precise manner. Several suppliers, such as CANNA, Advanced Hydroponics of Holland, and Terra Aquatica, offer nutrient solutions. It’s essential to use nutrients specifically formulated for hydroponics to avoid clogging the pipes. Feed charts provide clear guidance on which nutrients to add at each growth stage (germination, vegetative, flowering). Green Cult provides dosing guides tailored to their HydraMax system here

Water Quality: Water hardness, or the amount of lime it contains, varies depending on location. Tap water can also have impurities that aren’t ideal for hydroponic growing. Professional growers often use reverse osmosis water, which is highly purified through an osmosis system, removing bacteria, viruses, pesticides, nitrates, lime, and salts. While tap water can be used (as I did), its mineral content can make it harder to accurately measure the EC value, making nutrient management less precise.

Four Key Water Measurements: To create the best environment for the roots, certain water parameters need to be monitored and adjusted regularly. Measuring instruments are inexpensive on Amazon, though more advanced equipment is available at Green Cult.

  1. PPM (parts per million): Measures the concentration of nutrients in the water to ensure precise fertilization.
  2. EC (Electrical Conductivity): Measures the water’s conductivity, which helps determine nutrient levels.
  3. pH Level: Hydroponic water should have a pH between 5.5 and 6.5. If the pH drops below 5.5, nutrient uptake can be blocked.
  4. Water Temperature: Ideally, water temperature should be between 20 and 24°C. Below 20°C, plant growth slows, while above 24°C, the risk of pathogens increases. For larger systems (4 to 50 tanks or more), a chiller is recommended to maintain water temperature automatically. In my single-tank system, the temperature initially reached 25°C. However, since chillers start at around €350, I decided against purchasing one. The elevated temperature was caused by the pump, which heats the water as it circulates. Larger systems carry more water and are less exposed to this heating. A HydraMax expert suggested a simple solution: I bought a plug with an interval timer and loop function (not a regular timer), which allows this setting: 1 minute pump on, 5 minutes pump off. This cycle runs continuously. During the 1-minute pump activity, the water is oxygenated enough to keep the plant adequately supplied with oxygen, even during the 5-minute intervals when the pump is off.

Back to the project:

WEEK 1
Aqua and Terra are now both in the grow tent and receive 18 hours of light from the dimmable LED lamp, which is only turned up to 70%. The exhaust fan is also running at the lowest setting to circulate the air in the tent. Following the instructions in the dosing guide table, I added the appropriate nutrient liquids to the water and briefly measured the PPM, EC and water temperature. PPM and EC are quite high, which is normal for a freshly enriched solution, the temperature remains relatively stable at 21 degrees with the help of the pump interval switch.

In the first week, I had to change the water twice to get the temperature under control until I finally figured out the hack with the interval timer. By the way, it is very easy to drain the water from the HydraMax container. I simply placed a large tub next to the grow tent, switched off the pump briefly, took out the circulator, held it in the tub and started the pump again. This pumps the water out of the HydraMax container. But be careful: You should switch off the pump shortly before the lowest water level is reached so that the pump does not run without water. After refilling the water, don’t forget to top up the nutrients and measure the EC, PPM and water temperature.
Now, after 3 days, I only check the plants 1-2 times a day and everything seems to be going well. 
Size: Aqua just under 4cm, Terra barely measurable.

WEEK 2
In week 2 you can already see a difference between Aqua and Terra. With Aqua it is also very easy to observe the root growth by lifting the lid. The water temperature is currently around 23 degrees and, according to my grow consultant in the USA, the temperature is OK if the plant makes a good overall impression and shows no discolouration or other anomalies. In other words, observe closely and only adjust if there are any unusual changes. I measure the water temperature every day anyway.
Size: Aqua just under 6.5cm, Terra just under 6cm.

WEEK 3
Size: Aqua just under 11cm, Terra just under 7cm.

WEEK 4
In this week 4, I allowed higher water temperatures (up to 27 degrees for a short time, due to outside temperatures) and regularly checked whether the plant looked healthy or showed discolouration, but so far everything looks good. At the end of the week I changed some of the water, i.e. simply pumped out the old water and added fresh tap water. After that, of course, you have to add nutrients again and measure EC and PPM to top up the right amount. The differences in size are already clearly visible.
Size: Aqua just under 19cm, Terra 12cm.

WEEK 5
As I want to bring the water temperature down, I left the grow tent and the garage door open a little at night this week so that the warm air can escape better. And I have actually been able to keep the water temperature between 21 and 23 degrees on average this week. I also cut off 4 large fan leaves that were preventing the light from above to illuminate the lower part of the plant. The roots have already grown to an astonishing size in this short time.
Size: Aqua just under 34cm, Terra 25cm.

WEEK 6
Both plants are now growing faster, probably because the roots are getting bigger and bigger. With Aqua, I have to add water every 2-3 days as the plant absorbs more water and it condenses over the leaves (at least that’s my perception). I have cut off more larger fan leaves, which take the light away from the many smaller leaves below. In comparison, I have noticed that Aqua develops significantly more side shoots and stems, which leads to a more lush volume and ultimately to a higher yield when the flowers develop in a few weeks.
Size: Aqua 46cm, Terra 36cm.

WEEK 7
My small fan has finally been delivered and after installation I noticed relatively quickly that the internal temperature in the grow tent became lower and more stable, which also has an effect on the water temperature. The importance of the small fan that keeps the air in the tent ‘moving’ should not be underestimated. In the meantime, Aqua has become much more voluminous and ‘bushy’. This week I cut off some of the fan leaves again and started lollipopping, i.e. removing all the small leaves and branches at the bottom of the stem. This not only directs the energy generated by light, water and nutrients to the upper part, where the flowers will soon appear, but this is also where most of the light is. In other words, the focus is slowly shifted.

I will continue lollipopping in small steps over the next few days, as this should be done before the flowering phase and the change in light from 18 to 12 hours. I now have to top up the water and nutrients almost every day. The LED brightness also needs to be gradually raised due to the growth. In comparison, Terra looks ‘puny’ and I took her out of the tent especially for the photo so that you can see something of her at all. The stem diameter at the bottom is 0.9 cm for Terra and twice as much for Aqua (1.8 cm).
Size: Aqua 56cm, Terra 46cm.

ADDENDUM WEEK 7:
To clean the HydraMax container and completely replace the water, I took Aqua and the lid out of the container and ‘parked’ the roots in a bucket filled with water. This was of course a great opportunity to place Aqua and Terra next to each other and take photos. The result is clear and hardly needs to be commented on:

  • Aqua has more leaves and branches
  • Aqua has grown taller (no surprise, as I had already measured this beforehand)
  • The difference in trunk diameter is clearly visible

I also took the opportunity to cut away small branches and leaves in the lower section of Aqua (lollipopping) so that more light can penetrate from above and the focus of growth is placed on the main strands. I had already lollipopped Terra a few days ago.

WEEK 8 – Beginning of Blooming Stage
Today I made two decisions:

  1. To start the flowering process at the beginning of week 9. To do this, the light will be reduced from 18 to 12 hours and the hydroponic container will be emptied, cleaned and filled with fresh tap water. The special nutrients for the flowering phase are then added to the water.
  2. Terra is taken out of the grow tent because Aqua is spreading so much that there is hardly any room left for Terra. I think I’ve now seen enough of the difference between how Aqua and Terra grow under the same light conditions. In addition, Terra is not yet ready for the flowering phase and 12 hours of light would therefore be too little.

Now that Aqua is standing alone in the 1x1m grow tent, I can place her nicely in the middle. I will adjust the scrog net to the right height so that I can carefully pull the highest tips through the mesh to give the plant support as the flowers get bigger and heavier. You can also use the mesh to pull the tips apart and spread them across the width.
I am positively surprised how many more branches from the main stem can be observed in Aqua.

The stem diameter of Terra is 1 cm, Aqua has 2 cm.
Size: Aqua 67cm, Terra 61cm.

WEEK 9:
Today I had to make a tough decision with a heavy heart after I was informed by an experienced source that Aqua is already too big and will probably grow through the ceiling of the grow tent during the flowering phase. So I quickly watched a few YT videos on the subject of topping and then got down to snipping. As Aqua has a tall main stem and a lot of smaller side branches growing around it, I tried to cut all the branches down to the same height. It’s a pain when you have to cut off some of the beautiful tips 30cm down directly above a branch, but it’s obviously the right thing to do. I’ll see in the next few days. I pulled the scrog net further down and distributed all the secondary branches over the area by pulling the tips through the mesh. It all looks a bit ragged now, but in the next few days the tips will all be pointing upwards (or so I’ve been told). For reasons given, I will no longer measure the height. The root is getting incredibly large …
As already mentioned, I have taken Terra out of the grow tent and it is now growing outdoors in the sunshine.

WEEK 10:
Aqua has obviously survived the radical pruning well and, to my delight, I have discovered the first flower buds. This also makes it clear that the transition from the vegetative phase to the flowering phase is progressing slowly. On average, I have to top up 1 – 1 ½ litres of water every day, Aqua is quite thirsty. During the last week, I cut off a few larger leaves so that the plant forms an even canopy of leaves and flowers from above, but is still airy underneath. Terra has received a lot of sun outside this week, but is growing more slowly.

WEEK 11:
This week I have removed a lot of leaves that have spread out in the centre part of Aqua and prevent the light from shining further into the deeper regions than the canopy. The focus is clearly on clearing the individual strands of fan leaves and leaving only the ‘sugar leaves’ on, which, unlike fan leaves, have relatively high cannabinoid and terpene levels – so whatever you do, don’t throw them away! According to internet sources, the reason cannabis plants produce trichomes and cannabinoids is not to get us high, but to protect themselves from a variety of dangers such as predators and UV exposure. The trichome-covered leaves between the flowers are simply another protective measure.

Currently, the EC values are also much more stable than during the vegetative phase. I did a complete water change again (because the plant was fixed in the scrog net, I pumped all the water out of the container and filled in fresh tap water at the top without having to move the plant). I continue to top up the water daily and add CANNA booster for strong flower growth. Aqua has now expanded across the entire available width of the grow tent, partly due to the branches being pulled apart through the scrog net. The flowers are clearly growing, and fine pollen dust can already be seen on some of them.

WEEK 12:
Aqua is flowering in every nook and cranny. As a sativa-heavy plant, the flowering period takes a little longer, but the flowers are developing rapidly. Apart from adding water and nutrients, I didn’t have to do anything else.

ADDENDUM WEEK 12
I used sterile scissors again to cut all the larger leaves that prevent the light from above from penetrating deeper. Week 3 in the flowering phase is best suited for this. It makes sense to wear disposable gloves and long sleeves for this (which I didn’t do, but now learnt my lesson), because the leaves are already very sticky and exude the sticky coating onto your hands and arms. Apply following rule: cut off a maximum of 20% of the leaves and then allow the plant to rest for 3-4 days to recover from the stress.

For the last 2 weeks, the EC value should drop significantly. This step, also known as flushing, is supposed to force the plant to extract all the remaining nutrients from the roots and improve the quality of the buds.
To do this, I did a complete water change and finally just added CANNABoost and CANNAZym according to the dosage table. EC is now down from 1.200 to just under 0.500 and will move towards zero over the next few days. It seems like the roots fill 70% of the tank.

WEEK 13:
There’s hardly anything left to do apart from measuring the EC and topping up the water every day. The flowers are developing splendidly and I just have to be patient. Which is not easy … 😉

WEEK 14:
This week I have mainly been struggling with the humidity in the grow tent, which constantly wanted to rise towards 70% and which I have brought down through various measures. However, I didn’t manage to get it below 60%, the plants simply give off too much moisture. In two days’ time, I will bring it to an end and cut the plant into individual strands and hang it up to dry. I could certainly leave it for another week, but I don’t want to take any risks to avoid mould forming due to the high humidity.
All in all, the hydroponic cultivation lasted from 5 June to 5 September, so 93 days exactly, or 13 weeks and 2 days.

After drying for 18 days, the total yield of Aqua weighed exactly 180g. Not bad for a first try, but surely this can be increased with certain measures. If I use the costs listed below for the first harvest, I arrive at €5.64/g. However, for the next harvest I would only have the water, electricity and nutrient costs, i.e. the next harvest would be much cheaper.

MY PERSONAL CONCLUSION
Hydroponics is undoubtedly the most efficient way to achieve higher yields in less time. The difference compared to soil-bound plants was clearly visible in my trial and became greater with each passing day.

In my next run, I would definitely use a more powerful lamp, ideally at least 300W, to further shorten the growth and flowering phases and achieve higher yield. This would probably allow you to harvest within 12 weeks with increased yield. I would also start the blooming phase a week earlier. For Germany specifically you have to be careful here due to the legal requirements. It is simply unrealistic to believe that you can stay below 50 grams of cannabis with three plants when my hydroponical grow already achieved 180g with just one plant!

Such legal requirements put pressure on legal growers and create unnecessary hurdles. It is frustrating when regulations are made by people who have no idea about the subject. This easily puts you as  agrower in a legal grey area and forces you to destroy part of your crop in order to comply with the legal limits.
What I also love about hydroponics is the independence from the seasons. This means I can also grow in winter without any problems.

I hope you found my blog article interesting enough to run a test yourself. One fact is clear: With every grow you’ll gain more experience and more yield. This is why Hydroponics is a very interesting and efficient grow method for Cannabis Social Clubs or Grow Associations.

BTW, are you wondering what ever happened to Terra? Well, she is still in the blooming phase, back in the growtent, and will most probably be harvested 6 weeks after Aqua. I’ll post the yield amount as soon as this detail is available …